5.10 案例:KITTI 人、车物体检测
学习目标
- 目标
- 掌握YOLO结构的封装接口以及结构
- 掌握TFRecord文件的读取和存储
- 掌握KITTI数据集的TFRecord格式存储
- 应用
- 应用完成KITTI自动驾驶数据集的格式转换
5.10.1 KITTI 数据集介绍
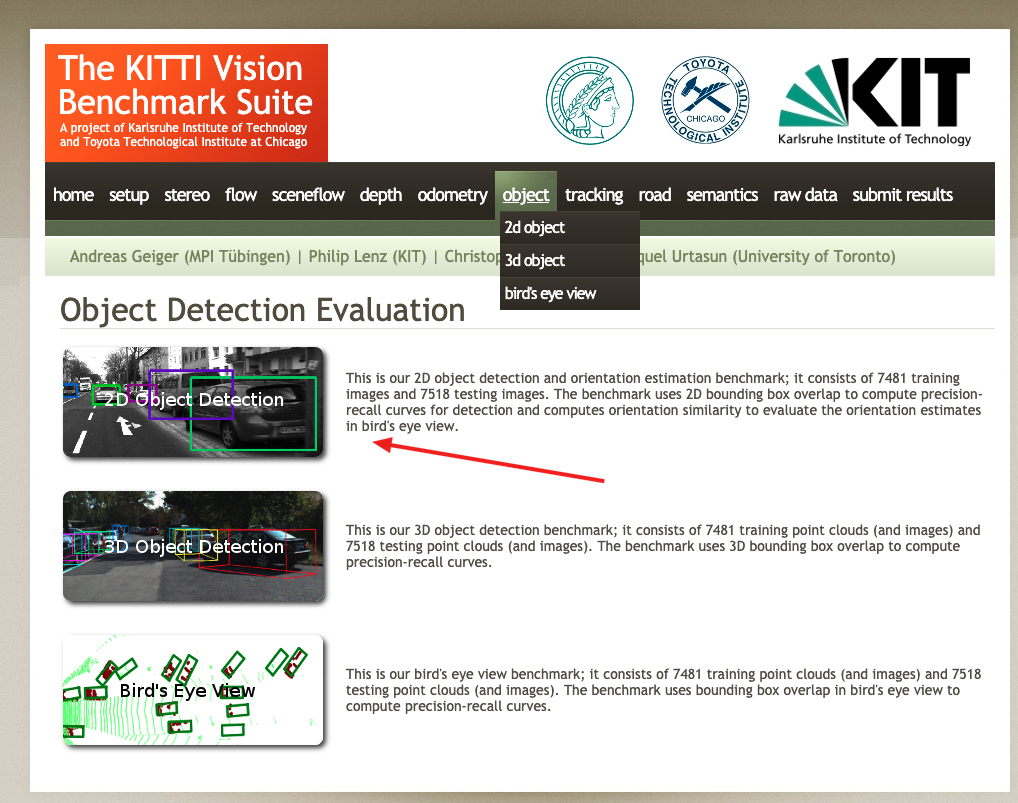
KITTI数据集由德国卡尔斯鲁厄理工学院和丰田美国技术研究院联合创办,是目前国际上最大的自动驾驶场景下的计算机视觉算法评测数据集。该数据集用于评测立体图像(stereo),光流(optical flow),视觉测距(visual odometry),3D物体检测(object detection)和3D跟踪(tracking)等计算机视觉技术在车载环境下的性能。KITTI包含市区、乡村和高速公路等场景采集的真实图像数据,每张图像中最多达15辆车和30个行人,还有各种程度的遮挡与截断。
地址:http://www.cvlibs.net/datasets/kitti/
1、kitti目标检测(object detection)2D数据集
2D数据集,是我们目前所接触的检测常用将物体使用平面框框起来的形式数据。数据和标签文件以及描述文件下载:
数据集内容介绍
TXT文件中包含着每个图片的标注信息,KITTI数据集为摄像机视野内的运动物体提供一个3D边框标注(使用激光雷达的坐标系)。该数据集的标注一共分为8个类别:’Car’, ’Van’, ’Truck’, ’Pedestrian’, ’Person (sit- ting)’, ’Cyclist’, ’Tram’ 和’Misc’或者'DontCare'。注意,'DontCare' 标签表示该区域没有被标注。
标注解释(value表示字符个数),按照标注文件分割如下,下图是一张图片的label注释,可以看到有载货汽车,汽车,自行车:

- type(类型):有'Car'-汽车, 'Van'-厢式货车, 'Truck'-载货卡车, 'Pedestrian'-行人, 'Person_sitting', 'Cyclist'-骑车人, 'Tram'-电车, 'Misc' or 'DontCare'这几种类型,其中'Misc'和'DontCare'表示可以忽略
- truncated(是否截断):0-1之间的值,这张图片为0.00没有截断。(截断就是目标对象在采集图像的边缘被截断了,是不完整的)
- occluded(被遮挡程度):0表示没有遮挡,1表示部分遮挡,2表示大面积遮挡,3表示不清楚。
- alpha(摄像机的偏转视角):不做分析
- bbox(目标在图像中的位置坐标):4个数字分别为599.41、156.40(左上)、629.75、189.25(右下):
- xmin、ymin、xmax、ymax
- 注意YOLO需要的bounding box格式是(center_x, center_y, width, height),后面的处理会说明
- dimensions+location/rotation_y(图像的三维坐标):这里不做分析。
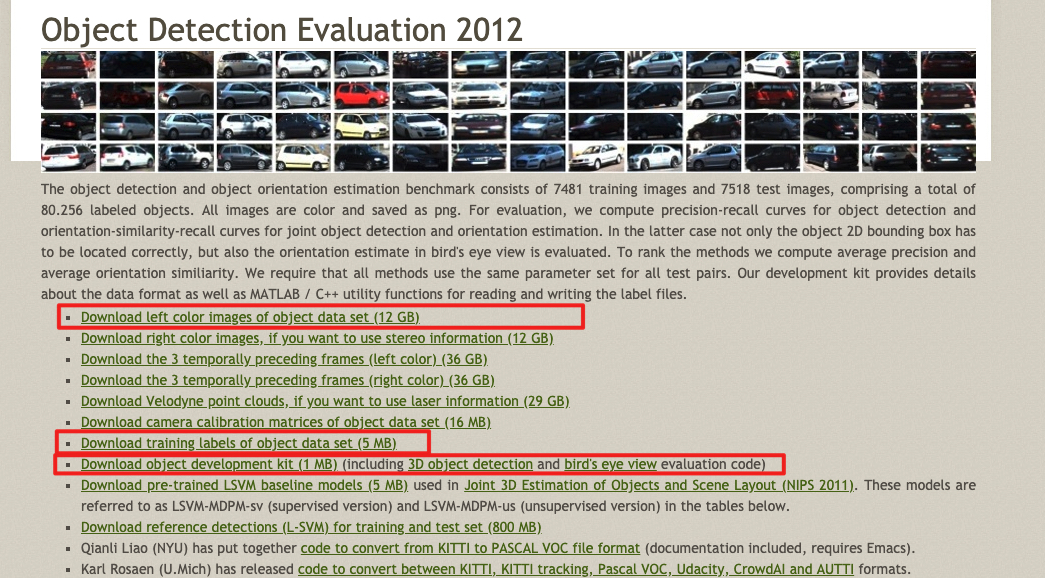
2、数据集下载
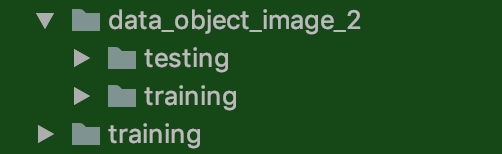
去官网下载之后的两个data_object_label_2.zip 5.6M和data_object_image_2.zip 12.57G文件。
解压之后如下:图片下面有训练和测试数据,而另一个training就是训练数据集的目标值存放文件里面为*.txt文件
5.10.2 YOLOV3源码实现分析
5.10.2.1 源码模型下载
1、官方自带开源
由论文作者,约瑟夫·切特·雷德蒙开源的称之为DarkNet,C语言中的开源神经网络,github地址:https://github.com/pjreddie/darknet。官方实现的特点是,思路就是原论文思路,测试精度和速度无太大差异,**但是也有一些缺点比如实现的语言不是我们所擅长的语言,实现的思路比较难懂。**
2、github高星实现版本
除了官方实现的,也会有一些其他机构或个人开源的熟悉的如TensorFlow、Pytorch的版本。这里我们后面做的案例就会使用。
- 最早实现的高星版本:keras-yolo3。
- TensorFlow实现的版本,相比官方版本,优点就是源码简单易读已复现,可能存在的缺点,速度性能上与C实现的版本会有一些差异。
实现不是从零开始,而是将别人的关键代码,复制进自己的项目。
复现步骤:1、熟悉算法思想 2、介绍相关应用 3、分模块进行实战练习
3、YOLO官网上提供了很多YOLO v3的预训练模型
地址:https://pjreddie.com/darknet/yolo/。大多时候思维是基于预训练模型训练自己需要的模型,比如预训练模型中其实包括了我们需要的大类,我们还需要再细分此类,那需要建立自己的训练数据集,并开展训练。不过当训练数据不理想或训练时间不充分时,二次训练模型在大类辨别基础上并不及预训练模型,这时可以直接试试预训练模型的效果。
5.10.2.2 YOLOV3-Tensorflow2.0源码分析
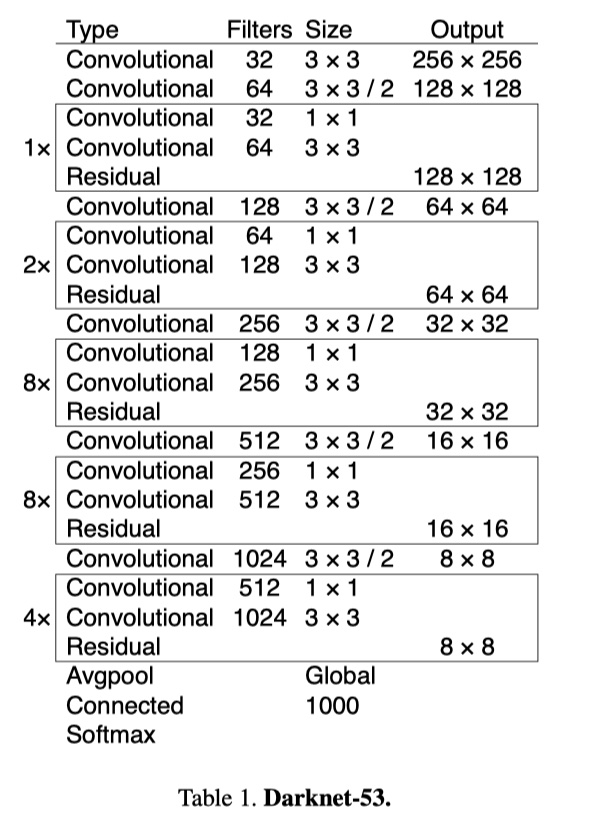
1、V3整体结构
YOLOv3引入了残差模块,并进一步加深了网络,改进后的网络有53个卷积层,命名为Darknet-53。YOLOv3借鉴了FPN的思想,从不同尺度提取特征。
YOLOV3的详细结构如下:
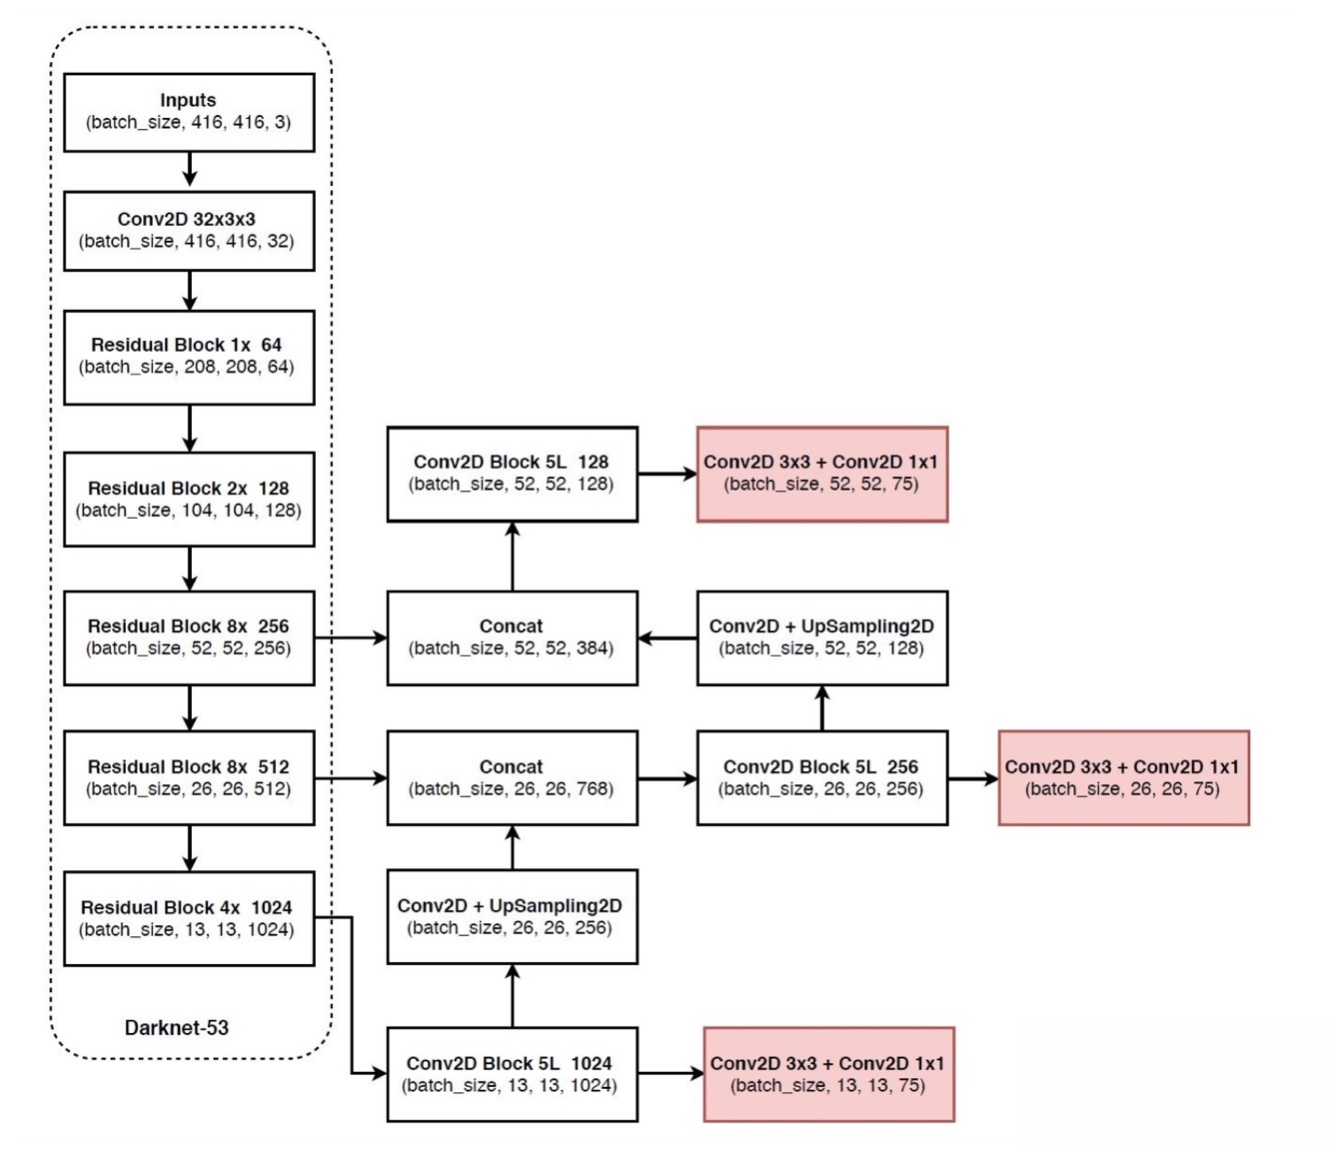
YOLOv3 的网络结构由基础特征提取网络、multi-scale特征融合层和输出层组成。
特征提取网络:YOLOv3使用DarkNet53作为特征提取网络:DarkNet53 基本采用了全卷积网络,用步长为2的卷积操作替代了池化层,同时添加了 Residual 单元,避免在网络层数过深时发生梯度弥散。
特征融合层:为了解决之前YOLO版本对小目标不敏感的问题,YOLOv3采用了3个不同尺度的特征图来进行目标检测,分别为13x13,26x26,52x52,用来检测大、中、小三种目标。特征融合层选取 DarkNet 产出的三种尺度特征图作为输入,借鉴了FPN(feature pyramid networks)的思想,通过一系列的卷积层和上采样对各尺度的特征图进行融合。
输出层:同样使用了全卷积结构,其中最后一个卷积层的卷积核个数是255:3x(20+4+1)=75表示一个grid cell包含3个bounding box,4表示框的4个坐标信息,1表示Confidence Score,20表示VOC数据集中80个类别的概率。如果换用别的数据集,20可以更改为实际类别数量。
2、源码主模型
YOLOV3的筑结构:
1、Darknet
2、3层YoloConv进行拼接然后卷积操作得到三层输出output_0,output_1,output_2(由深到浅)
- 3、如果是预测
- 三层输出直接通过yolo_boxes计算得到bbox, objectness, class_probs, pred_box
- 然后合并进行yolo_nms过滤输出预测结果
def YoloV3(size=None, channels=3, anchors=yolo_anchors,
           masks=yolo_anchor_masks, classes=80, training=False):
    x = inputs = Input([size, size, channels])

    x_36, x_61, x = Darknet(name='yolo_darknet')(x)

    # 下面通过YOLO的后续
    x = YoloConv(512, name='yolo_conv_0')(x)
    output_0 = YoloOutput(512, len(masks[0]), classes, name='yolo_output_0')(x)

    x = YoloConv(256, name='yolo_conv_1')((x, x_61))
    output_1 = YoloOutput(256, len(masks[1]), classes, name='yolo_output_1')(x)

    x = YoloConv(128, name='yolo_conv_2')((x, x_36))
    output_2 = YoloOutput(128, len(masks[2]), classes, name='yolo_output_2')(x)

    if training:
        return Model(inputs, (output_0, output_1, output_2), name='yolov3')

    boxes_0 = Lambda(lambda x: yolo_boxes(x, anchors[masks[0]], classes),
                     name='yolo_boxes_0')(output_0)
    boxes_1 = Lambda(lambda x: yolo_boxes(x, anchors[masks[1]], classes),
                     name='yolo_boxes_1')(output_1)
    boxes_2 = Lambda(lambda x: yolo_boxes(x, anchors[masks[2]], classes),
                     name='yolo_boxes_2')(output_2)

    outputs = Lambda(lambda x: yolo_nms(x, anchors, masks, classes),
                     name='yolo_nms')((boxes_0[:3], boxes_1[:3], boxes_2[:3]))

    return Model(inputs, outputs, name='yolov3')
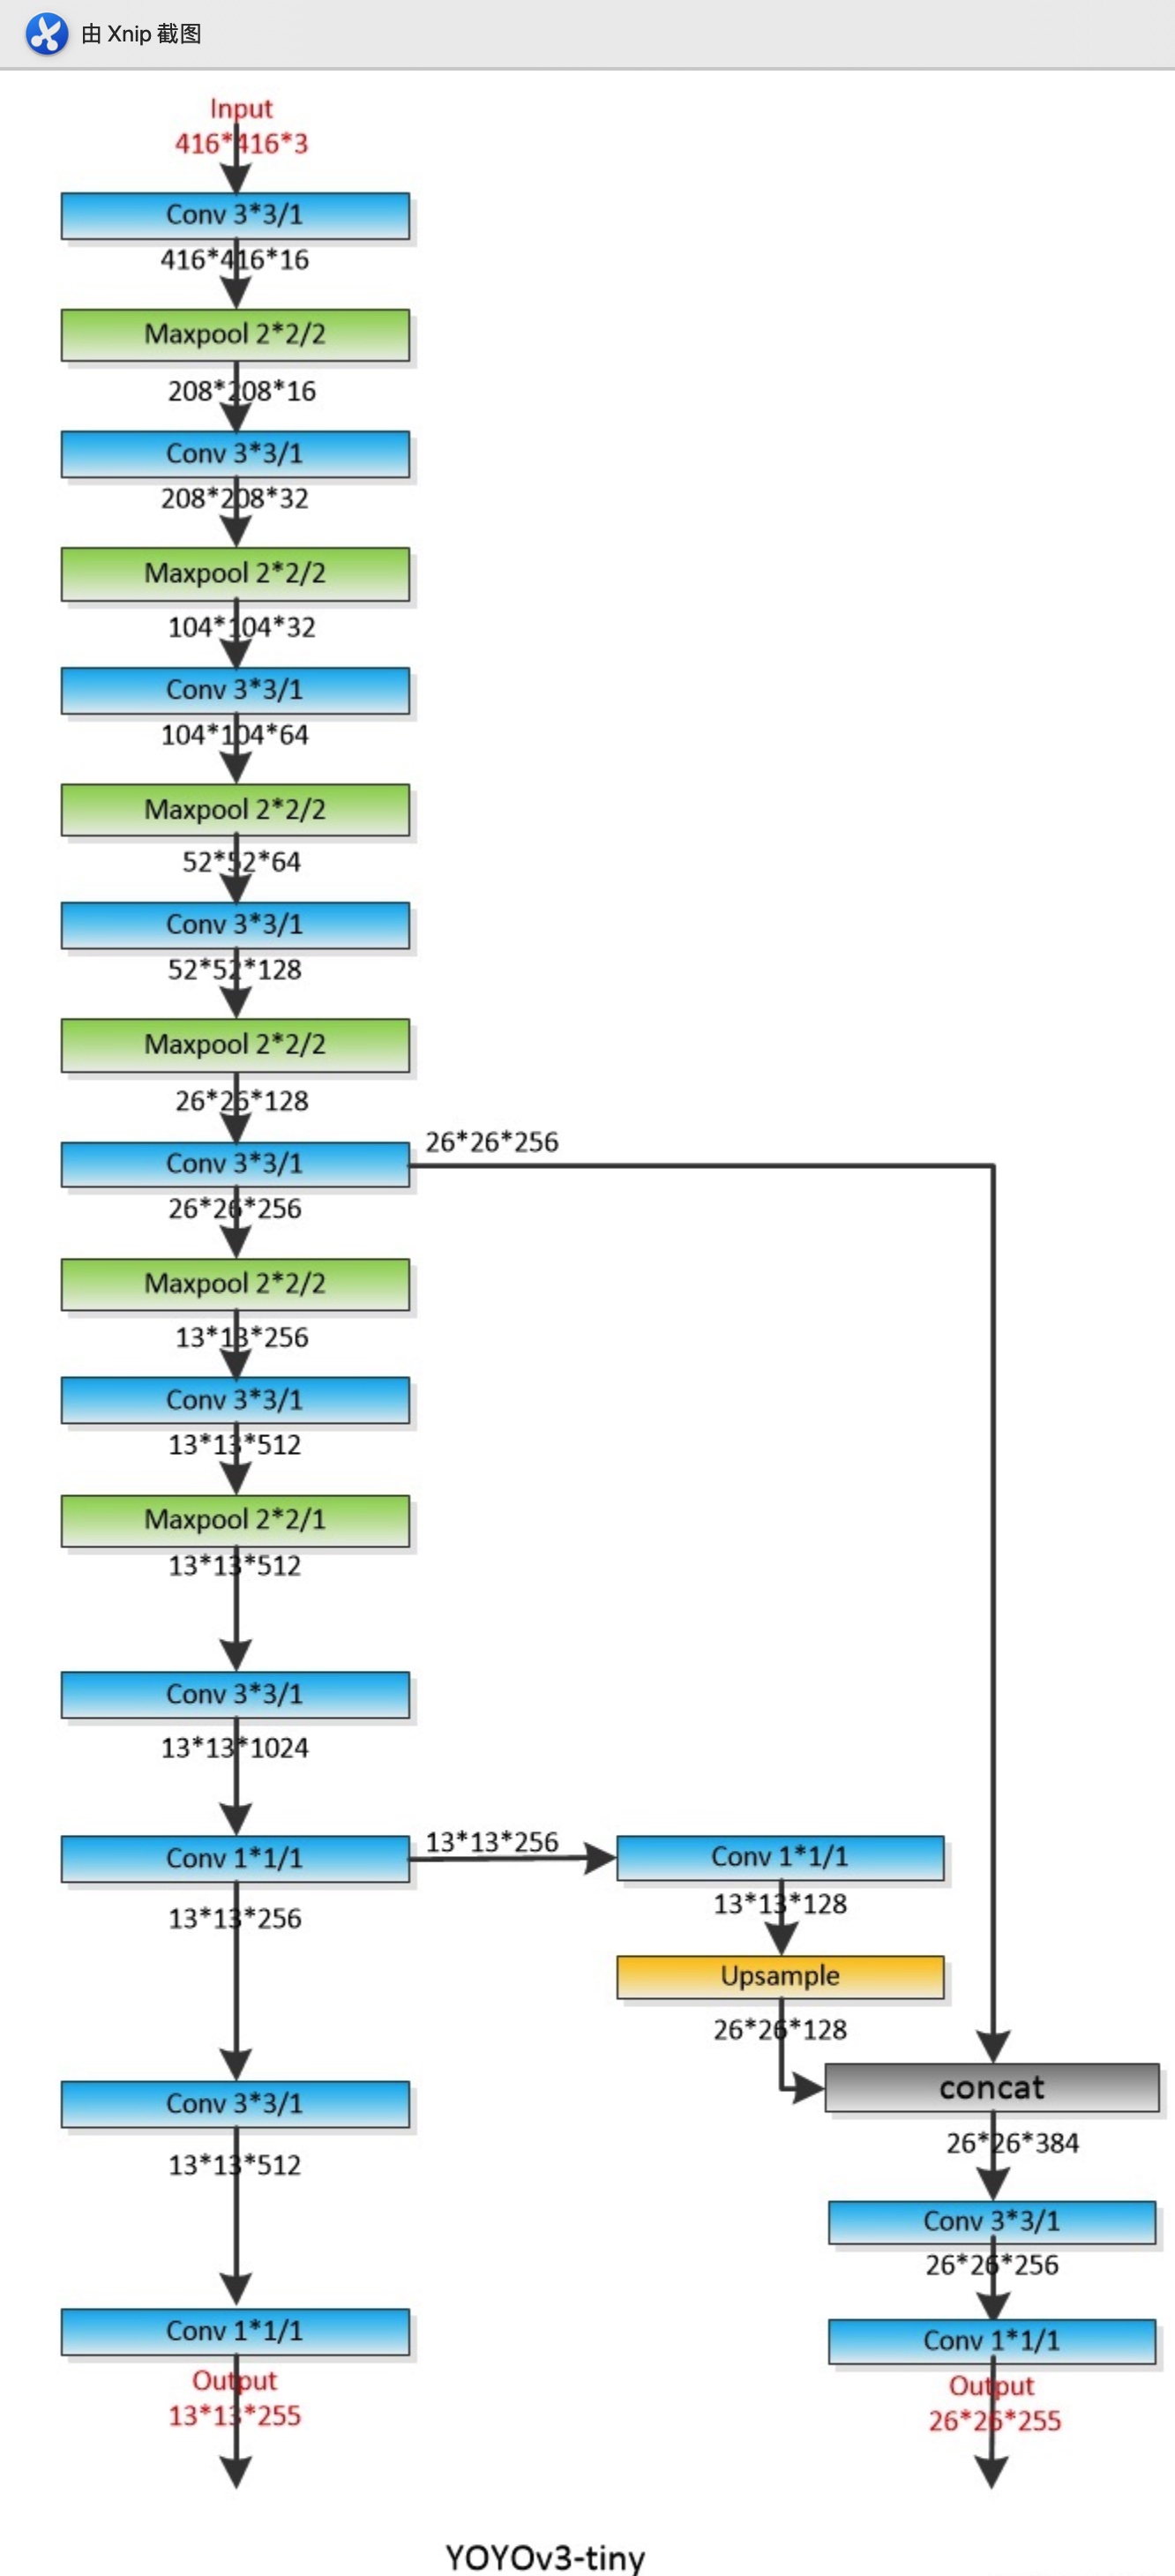
- YOLOV3Tiny结构
同样是YOLOV3的原作者提出来的一个速度更快但精度稍低的嵌入式版本系列——Tiny-YOLO。对于速度要求比较高的项目,YOLOV3-tiny会是首要选择。删除一些特征层并且输出只有两层特征做筛选。
注:还有使用其他轻量级骨干网络的YOLO变种,如MobileNet-YOLOv3等。
def YoloV3Tiny(size=None, channels=3, anchors=yolo_tiny_anchors,
               masks=yolo_tiny_anchor_masks, classes=80, training=False):
    x = inputs = Input([size, size, channels])

    x_8, x = DarknetTiny(name='yolo_darknet')(x)

    x = YoloConvTiny(256, name='yolo_conv_0')(x)
    output_0 = YoloOutput(256, len(masks[0]), classes, name='yolo_output_0')(x)

    x = YoloConvTiny(128, name='yolo_conv_1')((x, x_8))
    output_1 = YoloOutput(128, len(masks[1]), classes, name='yolo_output_1')(x)

    if training:
        return Model(inputs, (output_0, output_1), name='yolov3')

    boxes_0 = Lambda(lambda x: yolo_boxes(x, anchors[masks[0]], classes),
                     name='yolo_boxes_0')(output_0)
    boxes_1 = Lambda(lambda x: yolo_boxes(x, anchors[masks[1]], classes),
                     name='yolo_boxes_1')(output_1)
    outputs = Lambda(lambda x: yolo_nms(x, anchors, masks, classes),
                     name='yolo_nms')((boxes_0[:3], boxes_1[:3]))
    return Model(inputs, outputs, name='yolov3_tiny')
- 两者主结构Darknet与DarknetTiny的对比
- 1、YOLOV3重复若干层DarknetBlock,里面包含残差模块,输出包含三层特征
- 2、YOLOV3-Tiny实现删除残差模块,进行若干层采样,并且输出只有两层特征
# 1、重复若干层DarknetBlock,里面包含残差模块,输出包含三层特征
def Darknet(name=None):
    x = inputs = Input([None, None, 3])
    x = DarknetConv(x, 32, 3)
    x = DarknetBlock(x, 64, 1)
    x = DarknetBlock(x, 128, 2)  # skip connection
    x = x_36 = DarknetBlock(x, 256, 8)  # skip connection
    x = x_61 = DarknetBlock(x, 512, 8)
    x = DarknetBlock(x, 1024, 4)
    return tf.keras.Model(inputs, (x_36, x_61, x), name=name)

def DarknetBlock(x, filters, blocks):
    x = DarknetConv(x, filters, 3, strides=2)
    for _ in range(blocks):
        x = DarknetResidual(x, filters)
    return x

# 2、实现删除残差模块,进行若干层采样,并且输出只有两层特征
def DarknetTiny(name=None):
    x = inputs = Input([None, None, 3])
    x = DarknetConv(x, 16, 3)
    x = MaxPool2D(2, 2, 'same')(x)
    x = DarknetConv(x, 32, 3)
    x = MaxPool2D(2, 2, 'same')(x)
    x = DarknetConv(x, 64, 3)
    x = MaxPool2D(2, 2, 'same')(x)
    x = DarknetConv(x, 128, 3)
    x = MaxPool2D(2, 2, 'same')(x)
    x = x_8 = DarknetConv(x, 256, 3)  # skip connection
    x = MaxPool2D(2, 2, 'same')(x)
    x = DarknetConv(x, 512, 3)
    x = MaxPool2D(2, 1, 'same')(x)
    x = DarknetConv(x, 1024, 3)
    return tf.keras.Model(inputs, (x_8, x), name=name)
3、使用模型
# 初始化模型
model = YoloV3Tiny(args.size, training=True,classes=args.num_classes)

model = YoloV3(args.size, training=True, classes=args.num_classes)
5.10.3 KITTI人车检测项目
5.10.3.1 项目目录与模块
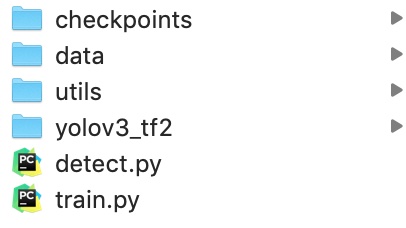
- data:包含所有数据目录
- utils:数据集转换等工具目录
- yolov3-tf2:TensorFlow2.0实现的YOLO多种模型目录
5.10.3.2 项目步骤分析
我们利用已经提供好的数据集和实现好的YOLO模型,去进行训练KITTI场景下的物体检测,包括人,车等多种物体。
- 1、数据集类型转换,KITTI转换成TFRecords文件
- 2、KITTI案例训练代码实现
- 3、图片和视频的检测代码实现
5.10.4 数据集类型转换-KITTI数据集转换成TFRecords文件
5.10.4.1 TFRecord-TensorFlow 数据集存储格式
TFRecord 是 TensorFlow 中的数据集存储格式。当我们将数据集整理成 TFRecord 格式后,TensorFlow 就可以高效地读取和处理这些数据集,从而帮助我们更高效地进行大规模的模型训练。
- 格式:TFRecord 可以理解为一系列序列化的
tf.train.Example元素所组成的列表文件,而每一个tf.train.Example又由若干个tf.train.Feature的字典组成。形式如下:
[
    {   # example 1 (tf.train.Example)
        'feature_1': tf.train.Feature,
        ...
        'feature_k': tf.train.Feature
    },
    ...
    {   # example N (tf.train.Example)
        'feature_1': tf.train.Feature,
        ...
        'feature_k': tf.train.Feature
    }
]
# 字典结构如
feature = {
                'image': tf.train.Feature(bytes_list=tf.train.BytesList(value=[image])),  # 图片是一个 Bytes 对象
                'label': tf.train.Feature(int64_list=tf.train.Int64List(value=[label]))  # 标签是一个 Int 对象
            }
1、保存TFRecord
为了将形式各样的数据集整理为 TFRecord 格式,我们需要对数据集中的每个元素进行以下步骤:
- 1、读取该数据元素到内存
- 2、将该元素转换为
tf.train.Example对象(每一个tf.train.Example由若干个tf.train.Feature的字典组成,因此需要先建立 Feature 的字典); - 3、将该
tf.train.Example对象序列化为字符串,并通过一个预先定义的tf.io.TFRecordWriter写入 TFRecord 文件。
2、读取 TFRecord 数据
则可按照以下步骤:
- 1、通过
tf.data.TFRecordDataset读入原始的 TFRecord 文件(此时文件中的tf.train.Example对象尚未被反序列化),获得一个tf.data.Dataset数据集对象; - 2、通过
Dataset.map方法,对该数据集对象中的每一个序列化的tf.train.Example字符串执行tf.io.parse_single_example函数,从而实现反序列化。
3、实例
将对cats_vs_dogs二分类数据集的训练集部分转换为 TFRecord 文件,并读取该文件的过程。因为图片过多,这里为了快速看到效果,选择了sample目录下的train数据集几张图片。
1、获取本地的数据
import os
import tensorflow as tf
import os
os.environ["TF_CPP_MIN_LOG_LEVEL"] = "2"

train_cats_dir = './cats_vs_dogs/train/cats/'
train_dogs_dir = './cats_vs_dogs/train/dogs/'
tfrecord_file = './cats_vs_dogs/train.tfrecords'

train_cat_filenames = [train_cats_dir + filename for filename in os.listdir(train_cats_dir)]
train_dog_filenames = [train_dogs_dir + filename for filename in os.listdir(train_dogs_dir)]
train_filenames = train_cat_filenames + train_dog_filenames
train_labels = [0] * len(train_cat_filenames) + [1] * len(train_dog_filenames)  # 将 cat 类的标签设为0,dog 类的标签设为1
2、迭代读取每张图片,建立 tf.train.Feature 字典和 tf.train.Example 对象,序列化并写入 TFRecord 文件。
    with tf.io.TFRecordWriter(tfrecord_file) as writer:
        for filename, label in zip(train_filenames, train_labels):
            # 1、读取数据集图片到内存,image 为一个 Byte 类型的字符串
            image = open(filename, 'rb').read()
            # 2、建立 tf.train.Feature 字典
            feature = {
                'image': tf.train.Feature(bytes_list=tf.train.BytesList(value=[image])),  # 图片是一个 Bytes 对象
                'label': tf.train.Feature(int64_list=tf.train.Int64List(value=[label]))  # 标签是一个 Int 对象
            }
            # 3、通过字典建立 Example
            example = tf.train.Example(features=tf.train.Features(feature=feature))
            # 4\将Example序列化并写入 TFRecord 文件
            writer.write(example.SerializeToString())

tfrecords的文件大小会缩小,由于这里数据及本身不大所以没有对比,后面我们的KITTI数据集生成的大小会小很多。
注意:tf.train.Feature只支持三种数据格式:
tf.train.BytesList:字符串或原始 Byte 文件(如图片),通过bytes_list参数传入一个由字符串数组初始化的tf.train.BytesList对象tf.train.FloatList:浮点数,通过float_list参数传入一个由浮点数数组初始化的tf.train.FloatList对象tf.train.Int64List:整数,通过int64_list参数传入一个由整数数组初始化的tf.train.Int64List对象。
3、读取 TFRecord 文件
我们可以通过以下代码,读取之间建立的 train.tfrecords 文件,并通过 Dataset.map 方法,使用 tf.io.parse_single_example 函数对数据集中的每一个序列化的 tf.train.Example 对象解码。
# 1、读取 TFRecord 文件
    raw_dataset = tf.data.TFRecordDataset(tfrecord_file)

    # 2、定义Feature结构,告诉解码器每个Feature的类型是什么
    feature_description = {
        'image': tf.io.FixedLenFeature([], tf.string),
        'label': tf.io.FixedLenFeature([], tf.int64),
    }

    # 3、将 TFRecord 文件中的每一个序列化的 tf.train.Example 解码
    def _parse_example(example_string):
        feature_dict = tf.io.parse_single_example(example_string, feature_description)
        feature_dict['image'] = tf.io.decode_jpeg(feature_dict['image'])  # 解码JPEG图片
        return feature_dict['image'], feature_dict['label']

    dataset = raw_dataset.map(_parse_example)

    for image, label in dataset:
        print(image, label)
这里的
feature_description类似于一个数据集的 “描述文件”,通过一个由键值对组成的字典,告知tf.io.parse_single_example函数每个tf.train.Example数据项有哪些 Feature,以及这些 Feature 的类型、形状等属性。tf.io.FixedLenFeature的三个输入参数shape、dtype和default_value(可省略)为每个 Feature 的形状、类型和默认值。这里我们的数据项都是单个的数值或者字符串,所以shape为空数组。
5.10.4.2 KITTI数据集转换成TFRecords文件
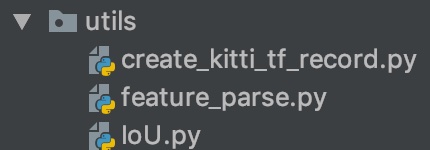
- 目录结构:
- create_kitti_tf_record.py:需要实现的主要存储逻辑
- 步骤:
- 1、进行读取主逻辑函数过程编写,指定需要传递的命令行参数
- 2、读取文件标准信息、过滤标注信息、进行构造example的feature字典
1、进行读取主逻辑函数过程编写,指定需要传递的命令行参数
- 定义convert_kitti_to_tfrecords,补充完整命令行参数
创建KITTI训练和验证集的tfrecord位置
列出所有的图片,进行每张图片的内容和标注信息的获取,写入到tfrecords文件
其中导入相关包和命令行参数如下设置
import hashlib
import io
import os

import numpy as np
import PIL.Image as pil
from PIL import Image
import tensorflow as tf

import feature_parse
from IoU import iou
import argparse
import sys

parser = argparse.ArgumentParser()
parser.add_argument('--data_dir', type=str, default='../data/kitti/',
                    help='kitti数据集的位置')
parser.add_argument('--output_path', type=str, default='../data/kitti_tfrecords/',
                    help='TFRecord文件的输出位置')
parser.add_argument('--classes_to_use', default='car ,van ,truck ,pedestrian ,cyclist ,tram', help='KITTI中需要检测的类别')
parser.add_argument('--validation_set_size', type=int, default=500,
                    help='验证集数据集使用大小')
编写的主函数逻辑如下:
def convert_kitti_to_tfrecords(data_dir, output_path, classes_to_use,
                               validation_set_size):
    """
    将KITTI detection 转换成TFRecords.
    :param data_dir: 源数据目录
    :param output_path: 输出文件目录
    :param classes_to_use: 选择需要使用的类别
    :param validation_set_size: 验证集大小
    :return:
    """
    train_count = 0
    val_count = 0

    # 1、创建KITTI训练和验证集的tfrecord位置
    # 标注信息位置
    annotation_dir = os.path.join(data_dir,
                                  'training',
                                  'label_2')

    # 图片位置
    image_dir = os.path.join(data_dir,
                             'data_object_image_2',
                             'training',
                             'image_2')

    train_writer = tf.io.TFRecordWriter(output_path + 'train.tfrecord')
    val_writer = tf.io.TFRecordWriter(output_path + 'val.tfrecord')

    # 2、列出所有的图片,进行每张图片的内容和标注信息的获取,写入到tfrecords文件
    images = sorted(os.listdir(image_dir))
    for img_name in images:

        # (1)获取当前图片的编号数据,并拼接读取相应标注文件
        img_num = int(img_name.split('.')[0])

        # (2)读取标签文件函数
        # 整数需要进行填充成与标签文件相同的6位字符串
        img_anno = read_annotation_file(os.path.join(annotation_dir,
                                                     str(img_num).zfill(6) + '.txt'))

        # (3)过滤标签函数
        # 当前图片的标注中 过滤掉一些没有用的类别和dontcare区域的annotations
        annotation_for_image = filter_annotations(img_anno, classes_to_use)

        # (4)写入训练和验证集合TFRecord文件
        # 读取拼接的图片路径,然后与过滤之后的标注结果进行合并到一个example中
        image_path = os.path.join(image_dir, img_name)
        example = prepare_example(image_path, annotation_for_image)
        # 如果小于验证集数量大小就直接写入验证集,否则写入训练集
        is_validation_img = img_num < validation_set_size
        if is_validation_img:
            val_writer.write(example.SerializeToString())
            val_count += 1
        else:
            train_writer.write(example.SerializeToString())
            train_count += 1

    train_writer.close()
    val_writer.close()


def main(args):

    convert_kitti_to_tfrecords(
        data_dir=args.data_dir,
        output_path=args.output_path,
        classes_to_use=args.classes_to_use.split(','),
        validation_set_size=args.validation_set_size)


if __name__ == '__main__':

    args = parser.parse_args(sys.argv[1:])
    main(args)
(2)读取读取标签文件函数
def read_annotation_file(filename):

    with open(filename) as f:
        content = f.readlines()
    # 分割解析内容
    content = [x.strip().split(' ') for x in content]
    # 保存内容到字典结构
    anno = dict()
    anno['type'] = np.array([x[0].lower() for x in content])
    anno['truncated'] = np.array([float(x[1]) for x in content])
    anno['occluded'] = np.array([int(x[2]) for x in content])
    anno['alpha'] = np.array([float(x[3]) for x in content])

    anno['2d_bbox_left'] = np.array([float(x[4]) for x in content])
    anno['2d_bbox_top'] = np.array([float(x[5]) for x in content])
    anno['2d_bbox_right'] = np.array([float(x[6]) for x in content])
    anno['2d_bbox_bottom'] = np.array([float(x[7]) for x in content])
    return anno
(3)过滤标签函数
def filter_annotations(img_all_annotations, used_classes):
    """
    过滤掉一些没有用的类别和dontcare区域的annotations
    :param img_all_annotations: 图片的所有标注
    :param used_classes: 需要留下记录的列别
    :return:
    """
    img_filtered_annotations = {}

    # 1、过滤这个图片中标注的我们训练指定不需要的类别,把索引记录下来
    # 方便后面在处理对应的一些坐标时候使用
    relevant_annotation_indices = [
        i for i, x in enumerate(img_all_annotations['type']) if x in used_classes
    ]

    # 2、获取过滤后的下标对应某个标记物体的其它信息
    for key in img_all_annotations.keys():
        img_filtered_annotations[key] = (
            img_all_annotations[key][relevant_annotation_indices])

    # 3、如果dontcare在我们要获取的类别里面,也进行组合获取,然后过滤相关的bboxes不符合要求的
    if 'dontcare' in used_classes:
        dont_care_indices = [i for i,
                             x in enumerate(img_filtered_annotations['type'])
                             if x == 'dontcare']

        # bounding box的格式[y_min, x_min, y_max, x_max]
        all_boxes = np.stack([img_filtered_annotations['2d_bbox_top'],
                              img_filtered_annotations['2d_bbox_left'],
                              img_filtered_annotations['2d_bbox_bottom'],
                              img_filtered_annotations['2d_bbox_right']],
                             axis=1)

        # 计算bboxesIOU,比如这样的
        # Truck 0.00 0 -1.57 599.41 156.40 629.75 189.25 2.85 2.63 12.34 0.47 1.49 69.44 -1.56
        # DontCare -1 -1 -10 503.89 169.71 590.61 190.13 -1 -1 -1 -1000 -1000 -1000 -10
        # DontCare -1 -1 -10 511.35 174.96 527.81 187.45 -1 -1 -1 -1000 -1000 -1000 -10
        # DontCare -1 -1 -10 532.37 176.35 542.68 185.27 -1 -1 -1 -1000 -1000 -1000 -10
        # DontCare -1 -1 -10 559.62 175.83 575.40 183.15 -1 -1 -1 -1000 -1000 -1000 -10
        ious = iou(boxes1=all_boxes,
                   boxes2=all_boxes[dont_care_indices])

        # 删除所有 bounding boxes 与 dontcare region 重叠的区域
        if ious.size > 0:
            # 找出下标
            boxes_to_remove = np.amax(ious, axis=1) > 0.0
            for key in img_all_annotations.keys():
                img_filtered_annotations[key] = (
                    img_filtered_annotations[key][np.logical_not(boxes_to_remove)])

    return img_filtered_annotations
2、读取文件标准信息、过滤标注信息、进行构造example的feature字典
def prepare_example(image_path, annotations):
    """
    对一个图片的Annotations转换成tf.Example proto.
    :param image_path:
    :param annotations:
    :return:
    """
    # 1、读取图片内容,转换成数组格式
    with open(image_path, 'rb') as fid:
        encoded_png = fid.read()
    encoded_png_io = io.BytesIO(encoded_png)
    image = pil.open(encoded_png_io)
    image = np.asarray(image)

    # 2、构造协议中需要的字典键的值
    # sha256加密结果
    key = hashlib.sha256(encoded_png).hexdigest()

    # 进行坐标处理
    width = int(image.shape[1])
    height = int(image.shape[0])
    # 存储极坐标归一化格式
    xmin_norm = annotations['2d_bbox_left'] / float(width)
    ymin_norm = annotations['2d_bbox_top'] / float(height)
    xmax_norm = annotations['2d_bbox_right'] / float(width)
    ymax_norm = annotations['2d_bbox_bottom'] / float(height)

    # 其他信息,难度以及字符串类别
    difficult_obj = [0] * len(xmin_norm)
    classes_text = [x.encode('utf8') for x in annotations['type']]

    # 3、构造协议example
    example = tf.train.Example(features=tf.train.Features(feature={
        'image/height': feature_parse.int64_feature(height),
        'image/width': feature_parse.int64_feature(width),
        'image/filename': feature_parse.bytes_feature(image_path.encode('utf8')),
        'image/source_id': feature_parse.bytes_feature(image_path.encode('utf8')),
        'image/key/sha256': feature_parse.bytes_feature(key.encode('utf8')),
        'image/encoded': feature_parse.bytes_feature(encoded_png),
        'image/format': feature_parse.bytes_feature('png'.encode('utf8')),
        'image/object/bbox/xmin': feature_parse.float_list_feature(xmin_norm),
        'image/object/bbox/xmax': feature_parse.float_list_feature(xmax_norm),
        'image/object/bbox/ymin': feature_parse.float_list_feature(ymin_norm),
        'image/object/bbox/ymax': feature_parse.float_list_feature(ymax_norm),
        'image/object/class/text': feature_parse.bytes_list_feature(classes_text),
        'image/object/difficult': feature_parse.int64_list_feature(difficult_obj),
        'image/object/truncated': feature_parse.float_list_feature(
            annotations['truncated'])
    }))

    return example
最终运行完成之后对应的目录输出TFRecord文件:
- trian.tfrecord
- val.tfrecord
那么仔细去观察之后会发现,总共大小5.5G训练+396M验证集,要比data_object_image_2.zip 12.57G少了将近一倍。
5.10.5 小结
- 掌握YOLO结构的封装接口以及结构
- 掌握TFRecord文件的读取和存储
- 掌握KITTI数据集的TFRecord格式存储